You can save a YouTube live stream with YouTube’s replay archive, record it on your computer with OBS, or use Upstream’s built-in recording. If you want a copy for editing or backup, set up recording before you go live. YouTube can archive streams shorter than 12 hours, but longer streams may not be saved at all.
This guide is for saving your own stream. If the show has already ended, start with the YouTube download steps below. If you have not gone live yet, choose where to record it first.
Choose how to record your YouTube live stream
Already finished? Check YouTube’s archive. Using OBS for the show? Start a local recording. Running the show through Upstream? Ask support to enable recording before you start. Recording captures video as it happens. Downloading saves a copy that already exists.
| Method | What you get | When to set it up | Main limit |
|---|---|---|---|
| YouTube archive | A replay on your channel, with a download option when available | Check the replay after the stream | Archive duration and download quality |
| OBS recording | A video file on your computer | Start recording before the show | Your computer must keep running and have free disk space |
| Upstream recording | An MP4 saved through Upstream | Request access, then enable recording before the show | Confirm recording length and storage with support |
For a show you cannot afford to lose, keep a recording as well as the YouTube replay. They serve different jobs: the replay is easy for viewers to watch, while your own file is ready for editing and backup.
Save a YouTube live stream with the automatic archive
YouTube can save streams shorter than 12 hours as replays. This applies whether you stream from a phone, a webcam or streaming software like OBS or Upstream. YouTube also recommends keeping a local backup. YouTube’s archive guidance
After the stream ends:
- Open YouTube Studio on the channel you streamed from.
- Select Content, then Live.
- Find the finished stream and open its details.
- Check its visibility and play the replay to make sure it is ready to share.
Choose public visibility if you want people to find the replay on your channel. Use unlisted or private when you need to review it first.
Download your YouTube live stream after it ends
To download your own saved stream, find it in YouTube Studio’s Content list, open its three-dot menu and choose Download when available. You can also open the replay’s details page and use Options > Download, as shown below.
Download your YouTube replay
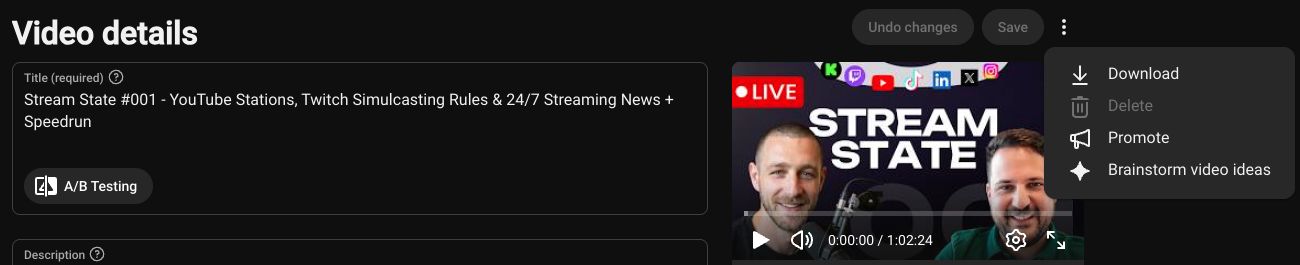
Check the file before you use it in an edit. YouTube’s download help lists MP4 downloads at 720p or 360p, depending on video size. A Studio download may not match the quality you originally sent. Keep your own recording if you need a higher-quality file for editing.
YouTube also points to Google Takeout for exporting uploaded videos in bulk. That is an export option, not a way to record a show that is happening now. YouTube download instructions
Plan around YouTube’s 12-hour archive limit
A stream longer than 12 hours may not be captured at all. Do not assume YouTube will keep the first or last 12 hours for you.
For a long event, prepare a separate recording before it starts. If your plan depends on YouTube replays, end your stream before the 12-hour mark rather than aiming for exactly 12 hours.
For a 24/7 channel, decide whether you need to keep the full output or just certain shows. Keeping the original playlist files is useful, but those files will not include a guest segment or an overlay added during the stream.
Record a YouTube live stream with OBS
OBS can record your show while sending it to YouTube. You save the scenes and sound you are producing, without recording the YouTube player in a browser.
Set up the recording before you go live:
- Open Settings > Output and use Simple output mode for this setup.
- Under Recording, set Recording Path to the folder where you want the file.
- Choose the recording quality. Same as stream uses the stream’s quality; a separate quality setting can add load to your computer.
- Choose Hybrid MP4 as the recording format, or Hybrid MOV if your version of OBS offers it, then save your settings.
- Click Start Recording before you begin the show. Use Start Streaming when you are ready to send it to YouTube.
- After the show, click Stop Recording and open the file in your chosen folder.
Record with Hybrid MP4
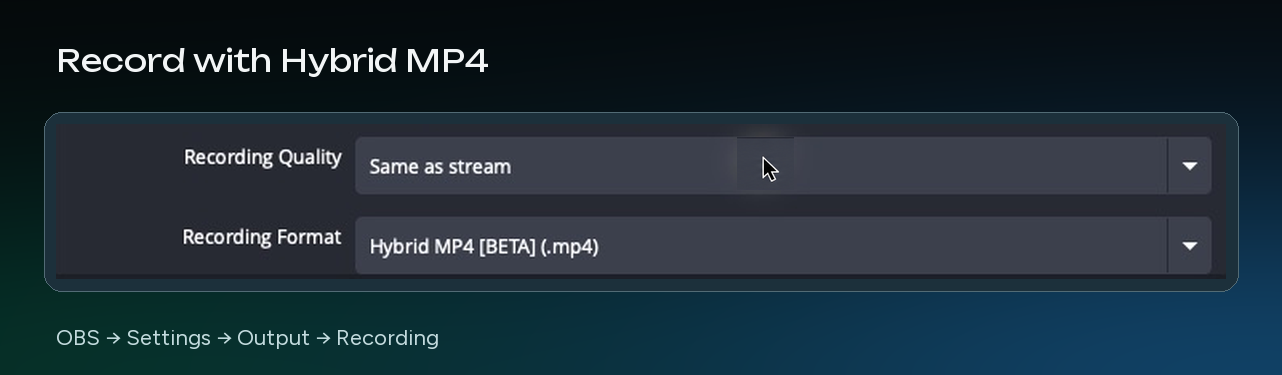
Choose a recording format that works in your editor
Choose Hybrid MP4 for a file you can open in most video editors. On macOS, Hybrid MOV is another option. Both help protect your recording if OBS crashes or your computer loses power. Regular MP4 needs to finish saving properly and can become unusable if recording stops unexpectedly.
MKV is another safe choice, but some editors cannot open it. If you record in MKV and your editor needs MP4, open File > Remux Recordings, select the MKV file and choose Remux. Remuxing puts the same video into an MP4 file without lowering its quality. Your editor still needs to support the video and audio formats inside the file. OBS file-format guidance
Check sound, disk space and recording quality
Record a short sample with the same scenes, microphone and other audio you will use during the show. Play it back with headphones. Check that speech is clear, music is at the right level and the picture matches the sound.
Test streaming and recording together. Watch for stuttering or sound that falls behind the picture, then lower the workload if your computer struggles.
At a combined video and audio bitrate of 10 Mbps, one hour uses about 4.5 GB before file overhead. Two hours use about 9 GB. This is a calculation: Mbps × 3,600 ÷ 8 ÷ 1,000 gives decimal GB per hour. Quality-based recording can vary its bitrate, so check a sample file and leave extra disk space.
A local recording can keep capturing your source if the connection to YouTube drops, as long as OBS and your computer keep running. It still depends on that computer: sleep, a crash or a power cut can stop the recording.
Record your YouTube stream directly in Upstream
Upstream can record your stream and save it as an MP4. Recording is available to all users on request. Contact us through support chat to get it enabled before your show.
To get started:
- Open Upstream support chat and ask us to enable recording on your account.
- Tell us the type of stream you run and how long you want to record.
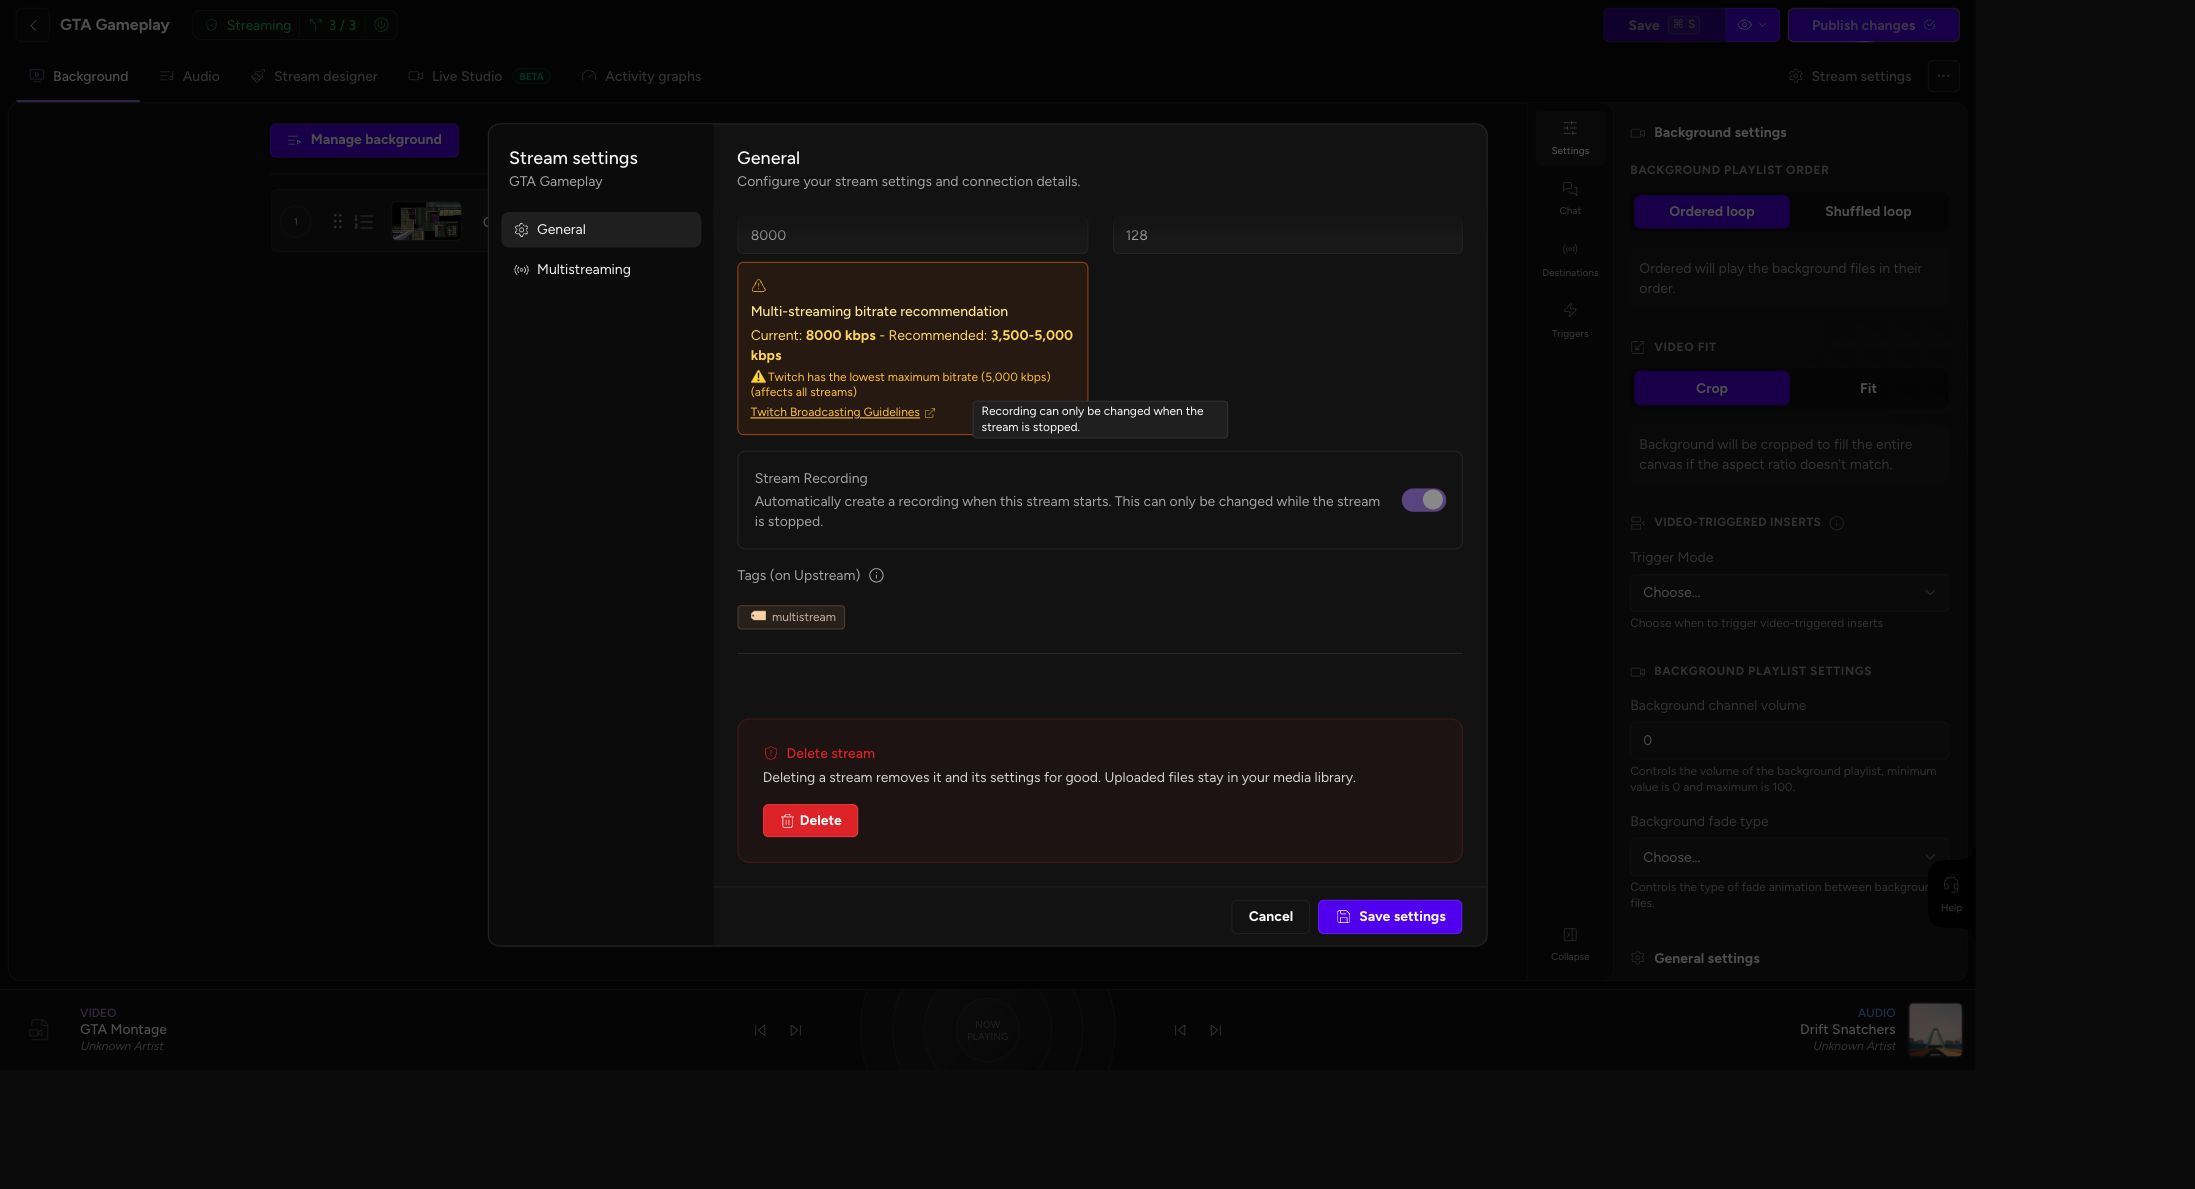
- While your stream is stopped, open Stream settings > General and turn on Stream Recording. Save your settings before you start.
- Click Start streaming and check Record this stream in the start dialog. Check the recording limit shown there, then run a short test. Once the recording is ready, open Media Library and find it by its stream name and date.
- Open the recording’s Options menu and choose Download. Play the saved MP4 to check the picture and sound before your show.
Enable recording before you go live
Download the saved MP4
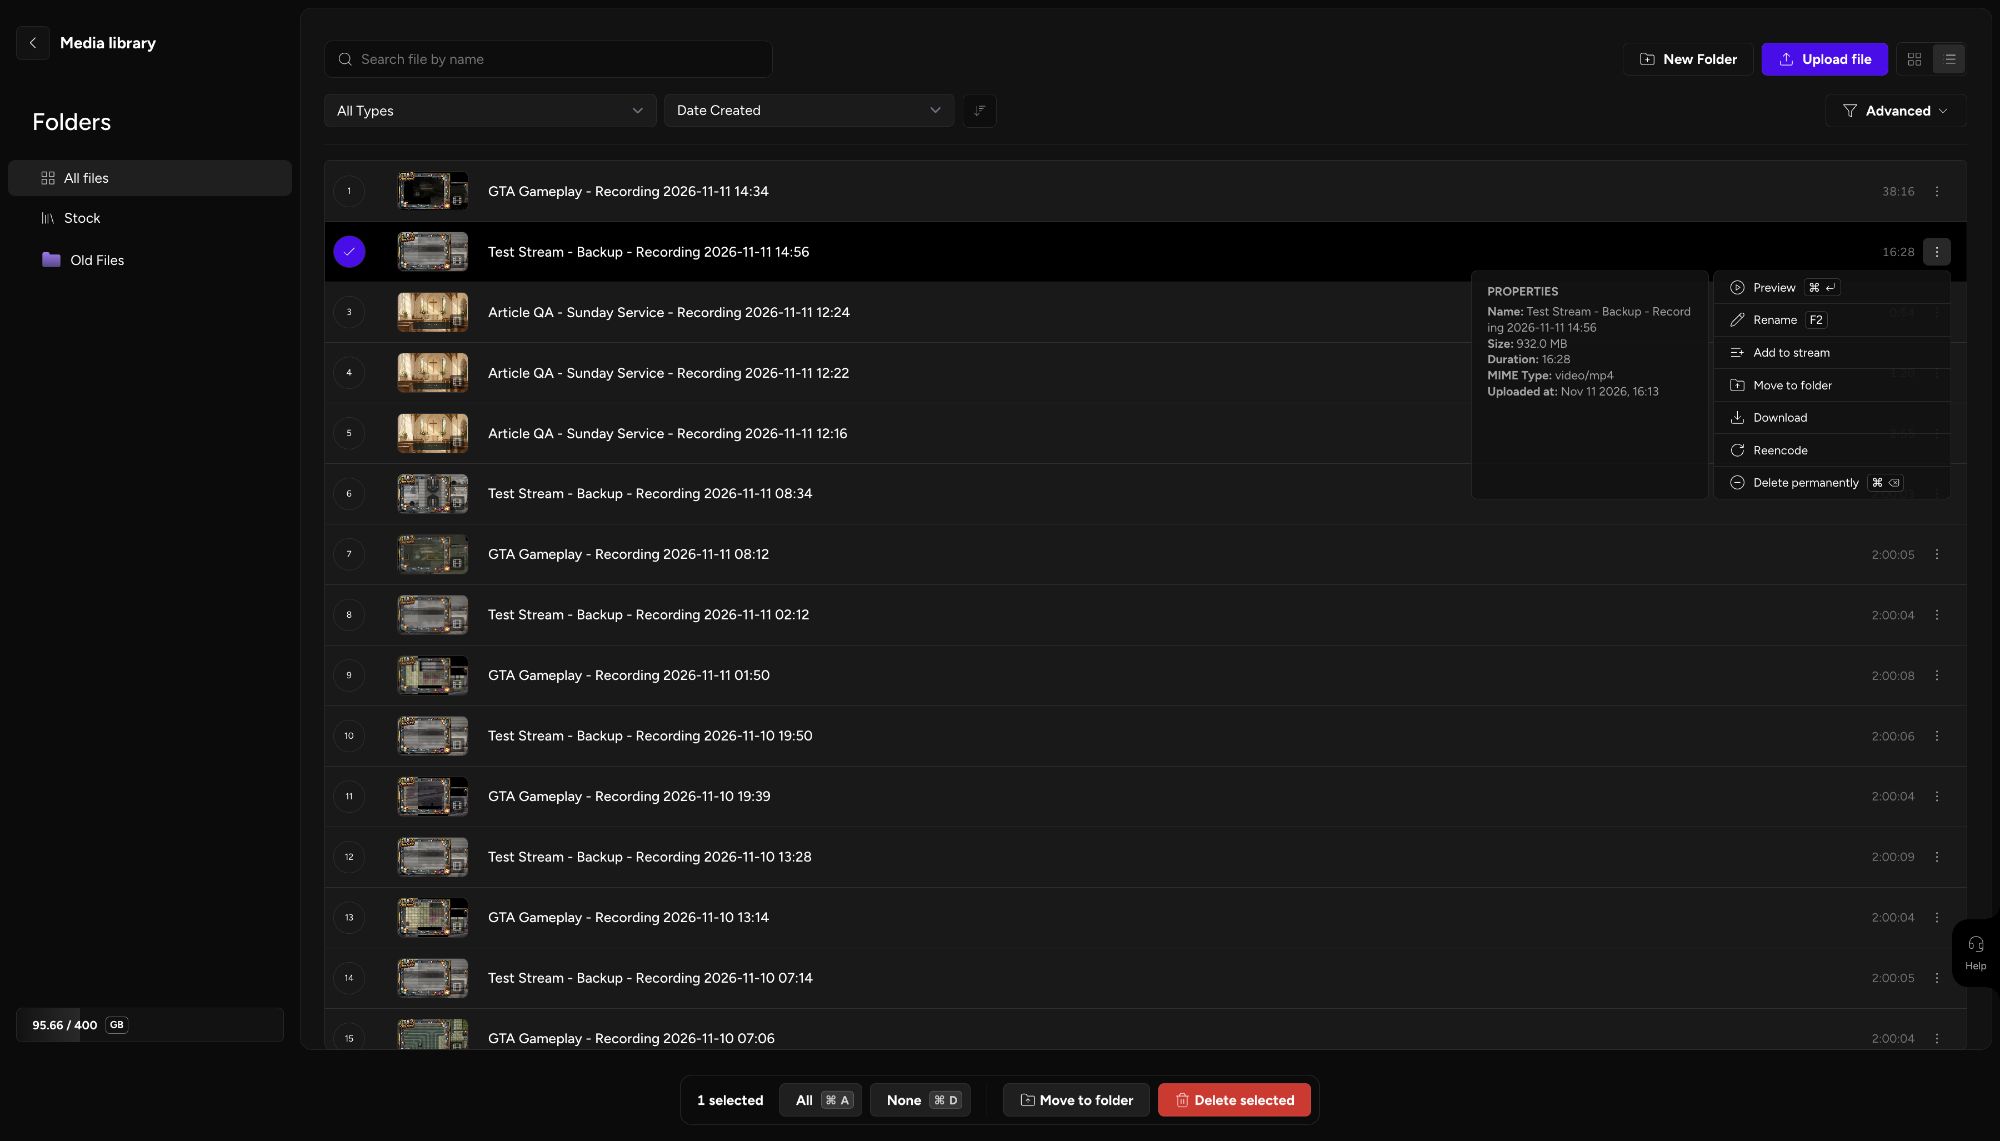
In our November 11, 2026 test, we recorded an unlisted YouTube stream, downloaded the MP4 and played it back in Media Library. The downloaded file contained 1080p video at 30 fps and stereo audio. Our test account showed a two-hour recording cap in the start dialog, so check your limit before a longer show.
Recording is covered in Upstream’s recording update. Ask support about the recording length and storage you need, especially for a long event.
If you host interviews or share your screen, Upstream Live Studio lets you produce the show from your browser. Open support chat and ask us to enable recording for your next stream.
Other ways to keep a copy of your stream
A camera recording may leave out parts of your finished show. For example, it can save the speaker on stage but miss a screen share you add in OBS, a remote guest or your overlays.
That clean camera footage can still be useful for editing. For a copy of the full show, record the final picture and sound mix with your streaming software or a hardware recorder connected to that output.
Screen recording is another option when you have permission to capture the video. It saves what plays on the screen, so buffering, a lower playback quality or missing system audio can affect the result. For your own show, recording at the source with OBS or Upstream is usually the more useful starting point.
Why didn’t YouTube save my live stream?
The replay is missing
Start by checking the right channel in YouTube Studio > Content > Live. Look for the finished stream and check whether processing is still in progress. A replay that is not public may still be visible to you in Studio.
Next, check how long you streamed. If it exceeded 12 hours, YouTube warns that it may not have been captured. Waiting does not guarantee that a missing archive will appear.
The Download option is unavailable
If the stream appears in Studio but Download is unavailable, check its status. A removed video or one with a copyright or Community Guidelines strike may be blocked from download. YouTube also limits owner downloads to five per video in 24 hours. See the full download restrictions.
You need another copy
Check your other copies: the OBS recording folder, your Upstream recording or the camera’s memory card. If no recording was made and YouTube has no archive, switching on a recorder afterward cannot recover the missing show.
Common recording questions
Can you record a YouTube live stream for free?
Yes. OBS is free and can save a recording to your computer while you stream. YouTube can also archive eligible streams without a separate recording tool. With OBS, you still need enough storage and a computer that can handle the job.
Can you save a YouTube live stream on your phone?
YouTube’s archive option also applies to streams made from its mobile app. You can manage the replay after the stream ends, subject to the same archive limits. To keep a file for editing, use the desktop Studio download steps above when the replay is ready.
If you use a phone’s screen recorder, test sound capture first. Do not assume it will save both the video and the audio you hear.
Can you record someone else’s YouTube live stream?
Ask the creator for a replay or a file you have permission to use. If you need an editing copy, request the original recording.
YouTube’s offline viewing feature is different from downloading an ordinary video file. Offline copies are stored for playback within YouTube, not as MP4 files in your gallery. YouTube’s offline viewing explanation
Before your next show, record a minute, stop, and play the file back. Check the opening picture, your mic and any guest audio. Then make sure you can find the file again.
Keep a live channel running 24/7.
Upload files, build a playlist, and let Upstream.so run continuous live playout from the cloud without OBS, a VPS, or an always-on computer.