There are two ways to get a free RTMP server, the address OBS sends your stream to. If you want to stream to YouTube, Twitch or other platforms, use a hosted one. Upstream gives you a server URL and stream key with nothing to install, sends your stream to up to 10 of 30+ platforms at once, and is free for 24 streaming hours a month. If you need a server you run yourself, for cameras on a local network, SRT input or a website player on your own server, run MediaMTX. It’s free and open source. Both setups are below, with the numbers from our MediaMTX test on October 9, 2026.
What an RTMP server does
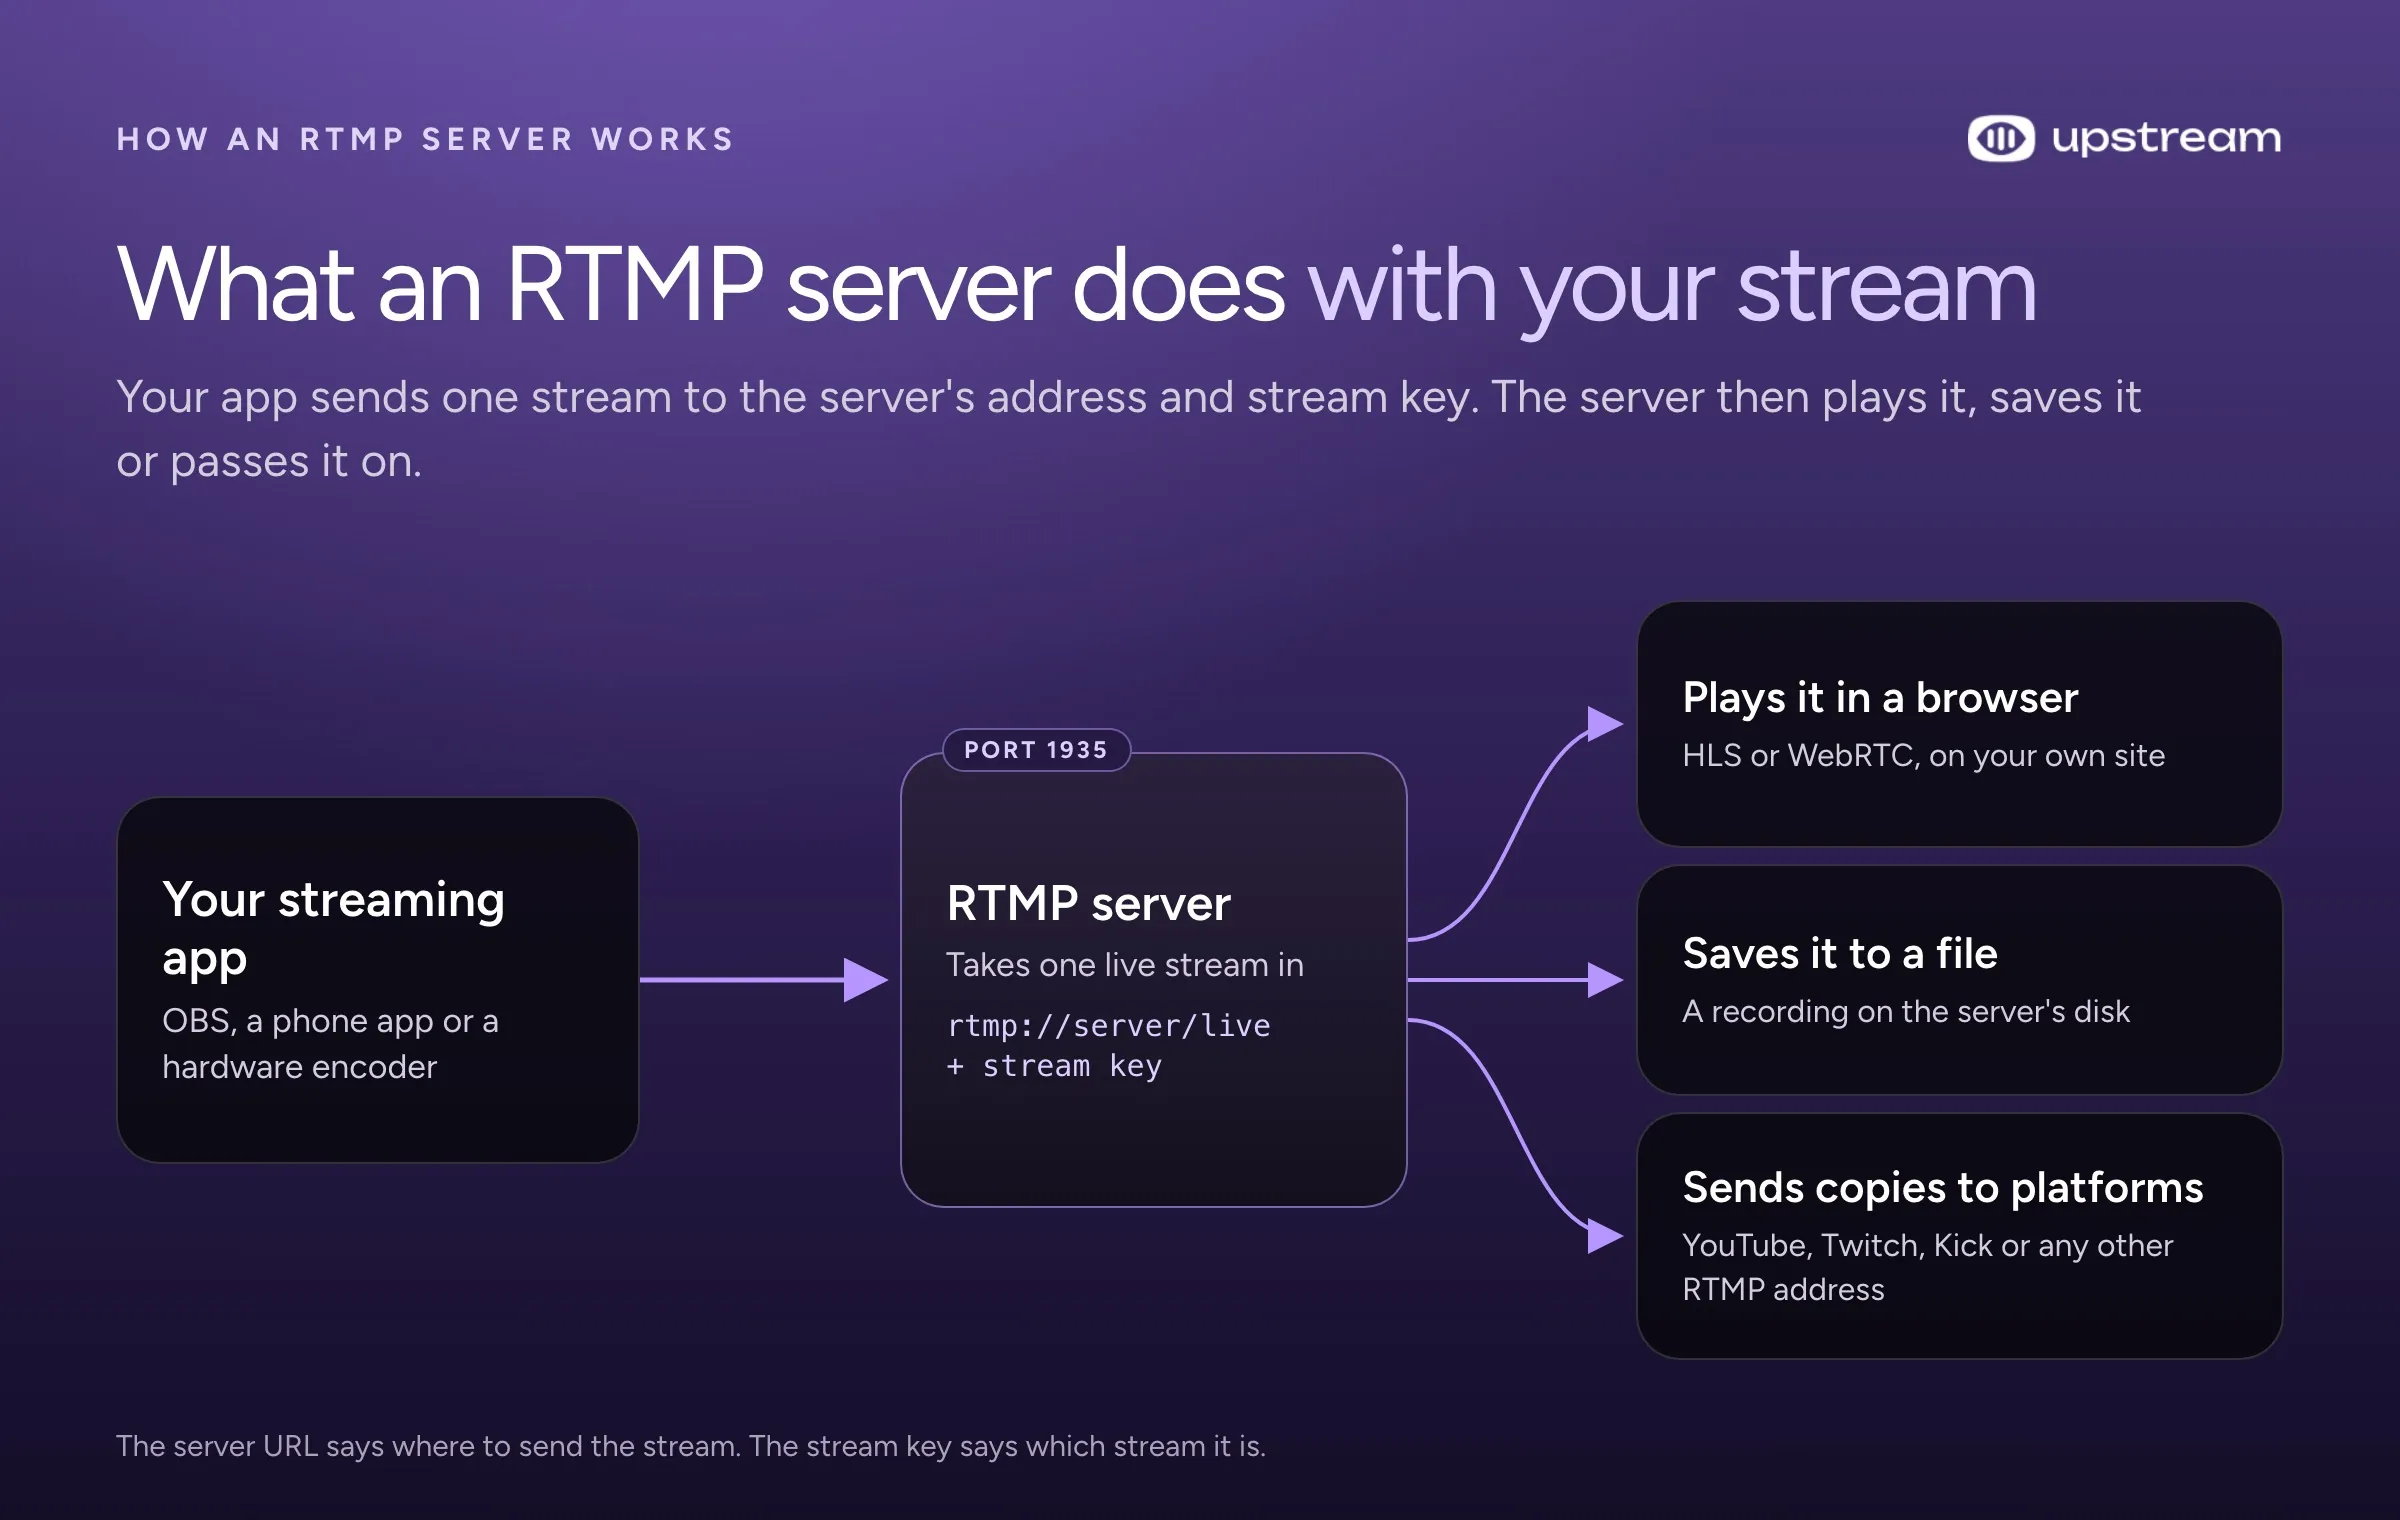
An RTMP server is the address your streaming app sends live video to. OBS, a phone app or a hardware encoder connects to it, usually on port 1935, and pushes one stream. The server then does something with it: plays it to viewers, saves it, or sends copies on to platforms.
Your app needs two things to find the right place: a server URL, such as rtmp://your-server/live, and a stream key, which tells the server which stream this is. YouTube, Twitch and Kick all run RTMP servers that work this way.
Which free RTMP server fits your job
| Your job | Use |
|---|---|
| Stream from OBS to YouTube, Twitch, Kick or other platforms | Upstream, hosted |
| Play uploaded videos as a scheduled live stream with your computer off | Upstream, hosted (24/7 needs a paid plan) |
| Test an encoder or a scene privately | MediaMTX on your computer |
| Play the stream on your own website | Upstream’s website player, or MediaMTX on a server |
| Pick up cameras on your local network | MediaMTX on your network |
| Take SRT or RTMPS input | MediaMTX |
| Platforms plus a player on your own server | Both: OBS to Upstream, Upstream to your MediaMTX |
If your job is in the first two rows, or you want a player on your own website, you don’t need to run a server. Start with Upstream.
Stream everywhere from one feed.
Send one live feed to Upstream and let the cloud deliver it to YouTube, Twitch, Kick, Facebook, and custom RTMP without making your upload connection carry every copy.
Get a free hosted RTMP server with Upstream
Upstream is a hosted RTMP server that’s already running. Your encoder sends it one stream, and Upstream sends it on to the platforms you pick, so your connection uploads one copy however many platforms you add. There’s nothing to install or update.
- Create a free account and choose Multistream from OBS. Upstream gives the stream an RTMP server URL,
rtmp://ingest.upstream.so:1935/live, and a stream key, or an OBS profile to import. - Add your platforms. Sign in with YouTube, Twitch or Kick, paste a stream key for Facebook, or add a server and key for TikTok or any other RTMP or SRT address. Up to 10 of 30+ platforms at once.
- In OBS, open Settings, then Stream, choose Custom, paste the URL and key, and click Start Streaming.
The free plan includes 24 streaming hours a month at 1080p and 30 fps, with no credit card and no watermark. Paid plans start at $30 a month and add 24/7 streaming, 60 fps and 4K.
Each platform needs its own copy of your stream, so the copies add up fast when your own computer or server sends them. Put in your upload speed to see what fits each way:
With Mbps upload, I'll stream to via .
Includes and extra RTMP outputs.
Not sure of your upload speed? Test it in about 10 seconds, on one connection, the way OBS sends a stream.
- Upload
- – Mbps
- Latency
- – ms
- Jitter
- – ms
Your 1080p · 60 fps multistream configuration
OBS encoder settings
- Video bitrate
- 6,000 kbps · CBR
- Audio bitrate
- 128 kbps · AAC
- Keyframe interval
- 2 s
Settings → Output → Streaming
≈ 2.8 GB uploaded per hour · safe upload target = (video + 0.128 audio) × 1 feed × 1.5
- This result uses Twitch's standard H.264 path at up to 6 Mbps. Eligible Enhanced Broadcasting uses different codecs and higher limits; enable it in your streaming software (OBS Settings → Stream) if you qualify.
What each destination gets
H.264 bitrate starting points
YouTube's current H.264 recommendations set the quality baseline. The calculator lowers that number when a checked destination has a stricter cap.
720p · 30 fps
- OBS video bitrate
- 4,000 kbps
- Video
- 4.00 Mbps
- One-feed upload +50%
- 6.19 Mbps
720p · 60 fps
- OBS video bitrate
- 6,000 kbps
- Video
- 6.00 Mbps
- One-feed upload +50%
- 9.19 Mbps
1080p · 30 fps
- OBS video bitrate
- 10,000 kbps
- Video
- 10.0 Mbps
- One-feed upload +50%
- 15.2 Mbps
1080p · 60 fps
- OBS video bitrate
- 12,000 kbps
- Video
- 12.0 Mbps
- One-feed upload +50%
- 18.2 Mbps
1440p · 30 fps
- OBS video bitrate
- 15,000 kbps
- Video
- 15.0 Mbps
- One-feed upload +50%
- 22.7 Mbps
1440p · 60 fps
- OBS video bitrate
- 24,000 kbps
- Video
- 24.0 Mbps
- One-feed upload +50%
- 36.2 Mbps
4K · 30 fps
- OBS video bitrate
- 30,000 kbps
- Video
- 30.0 Mbps
- One-feed upload +50%
- 45.2 Mbps
4K · 60 fps
- OBS video bitrate
- 35,000 kbps
- Video
- 35.0 Mbps
- One-feed upload +50%
- 52.7 Mbps
(video + 0.128 Mbps audio) × outbound feeds × headroom. A cloud multistream uses one outbound feed from your encoder. Local fan-out multiplies the feed by every destination. The model assumes 128 kbps stereo audio and that the same encoded feed is relayed unchanged to every destination. Test with real motion and monitor stream health before an event.
Sources · verified August 7, 2026
- YouTube Live encoder settings · H.264 bitrates, 128 Kbps stereo audio.
- Twitch standard guidance · the calculator keeps the common H.264 path at 6 Mbps. Enhanced Broadcasting (HEVC, Partner/Affiliate) allows up to 9 Mbps at 1440p but does not apply to relayed standard RTMP, so it is not modeled here.
- Kick streaming settings · 8 Mbps, 1080p, 60 fps maximum.
- Facebook Live specs · 1080p60, up to 9 Mbps video.
- OBS connection troubleshooting · bitrate must fit stable upload; wired is preferred.
One upload. Every destination.
See how Upstream sends one live feed to multiple platforms from the cloud.
Upstream also plays the stream in a player on your own website, from the same upload. It doesn’t take RTMPS, SRT or WebRTC input or run on your local network. For those jobs, set up MediaMTX below, or use both.
Free RTMP server software you can run yourself
Four free, open-source servers are worth knowing. All of them have had a release in the last few weeks except nginx-rtmp.
| Software | Best for | Takes streams in over | Plays them out as | Latest release or change (checked Oct 9, 2026) |
|---|---|---|---|---|
| MediaMTX | Most setups: testing, local cameras, a browser player, forwarding | RTMP, RTMPS, SRT, WebRTC, RTSP | HLS, WebRTC, RTMP, SRT, RTSP | v1.21.2, released Oct 8, 2026 |
| nginx with the nginx-rtmp module | People who already run nginx | RTMP | RTMP, HLS, MPEG-DASH | Last code change Dec 24, 2024. Last tagged release v1.2.2 |
| SRS | Large setups and clusters | RTMP, SRT, WebRTC | HLS, WebRTC, HTTP-FLV | v6.0-r2, released Sep 24, 2026 |
| Owncast | A Twitch-style site of your own, with chat | RTMP | A web page with a player and chat | v0.3.0, released Sep 3, 2026 |
We use MediaMTX below. It’s a single download, it reads one plain config file, and it forwards streams to other servers without extra tools. We also tested nginx-rtmp, and there’s a section on it further down.
Set up MediaMTX with Docker
Docker runs MediaMTX in a container, so you install Docker once and never install MediaMTX itself. The same setup works on Mac, Windows and Linux. The commands below use Mac and Linux line breaks (the \ at the end of a line). In Windows PowerShell, put each command on one line.
- Install Docker Desktop (Mac or Windows) or Docker Engine (Linux).
- Open a terminal and run:
docker run --rm -it \
  -p 1935:1935 -p 8888:8888 -p 8889:8889 -p 8189:8189/udp \
  -e MTX_WEBRTCADDITIONALHOSTS=127.0.0.1 \
bluenviron/mediamtx:1- Wait for these lines. The first start downloads the image, about 66 MB.
INF MediaMTX v1.21.2, linux, arm64
INF [RTMP] started with listener on :1935 (TCP/RTMP)
INF [HLS] started with listener on :8888 (TCP/HTTP)
INF [WebRTC] started with listeners on :8889 (TCP/HTTP), :8189 (UDP/ICE)
That’s a working RTMP server. The 1 tag is the newest 1.x release, which was 1.21.2 when we tested. Use bluenviron/mediamtx:1.21.2 to run exactly what we ran. TCP port 1935 takes RTMP, 8888 serves HLS, and 8889 plus UDP 8189 serve WebRTC to browsers. The MTX_WEBRTCADDITIONALHOSTS line tells WebRTC which address browsers should connect to. Use 127.0.0.1 on your own computer, or the server’s IP address when other devices will watch.
No Docker? MediaMTX’s install guide also offers a single file for Windows, macOS and Linux on its GitHub releases page. Download the archive for your system, unzip it, and run ./mediamtx (.\mediamtx.exe on Windows) from the folder that holds mediamtx.yml. We tested the Docker route. The single-file route comes from MediaMTX’s guide.
Send your stream from OBS
In OBS, open Settings, then Stream, and enter:
| Setting | Value |
|---|---|
| Service | Custom… |
| Server | rtmp://localhost (or the server’s IP address) |
| Stream Key | live |
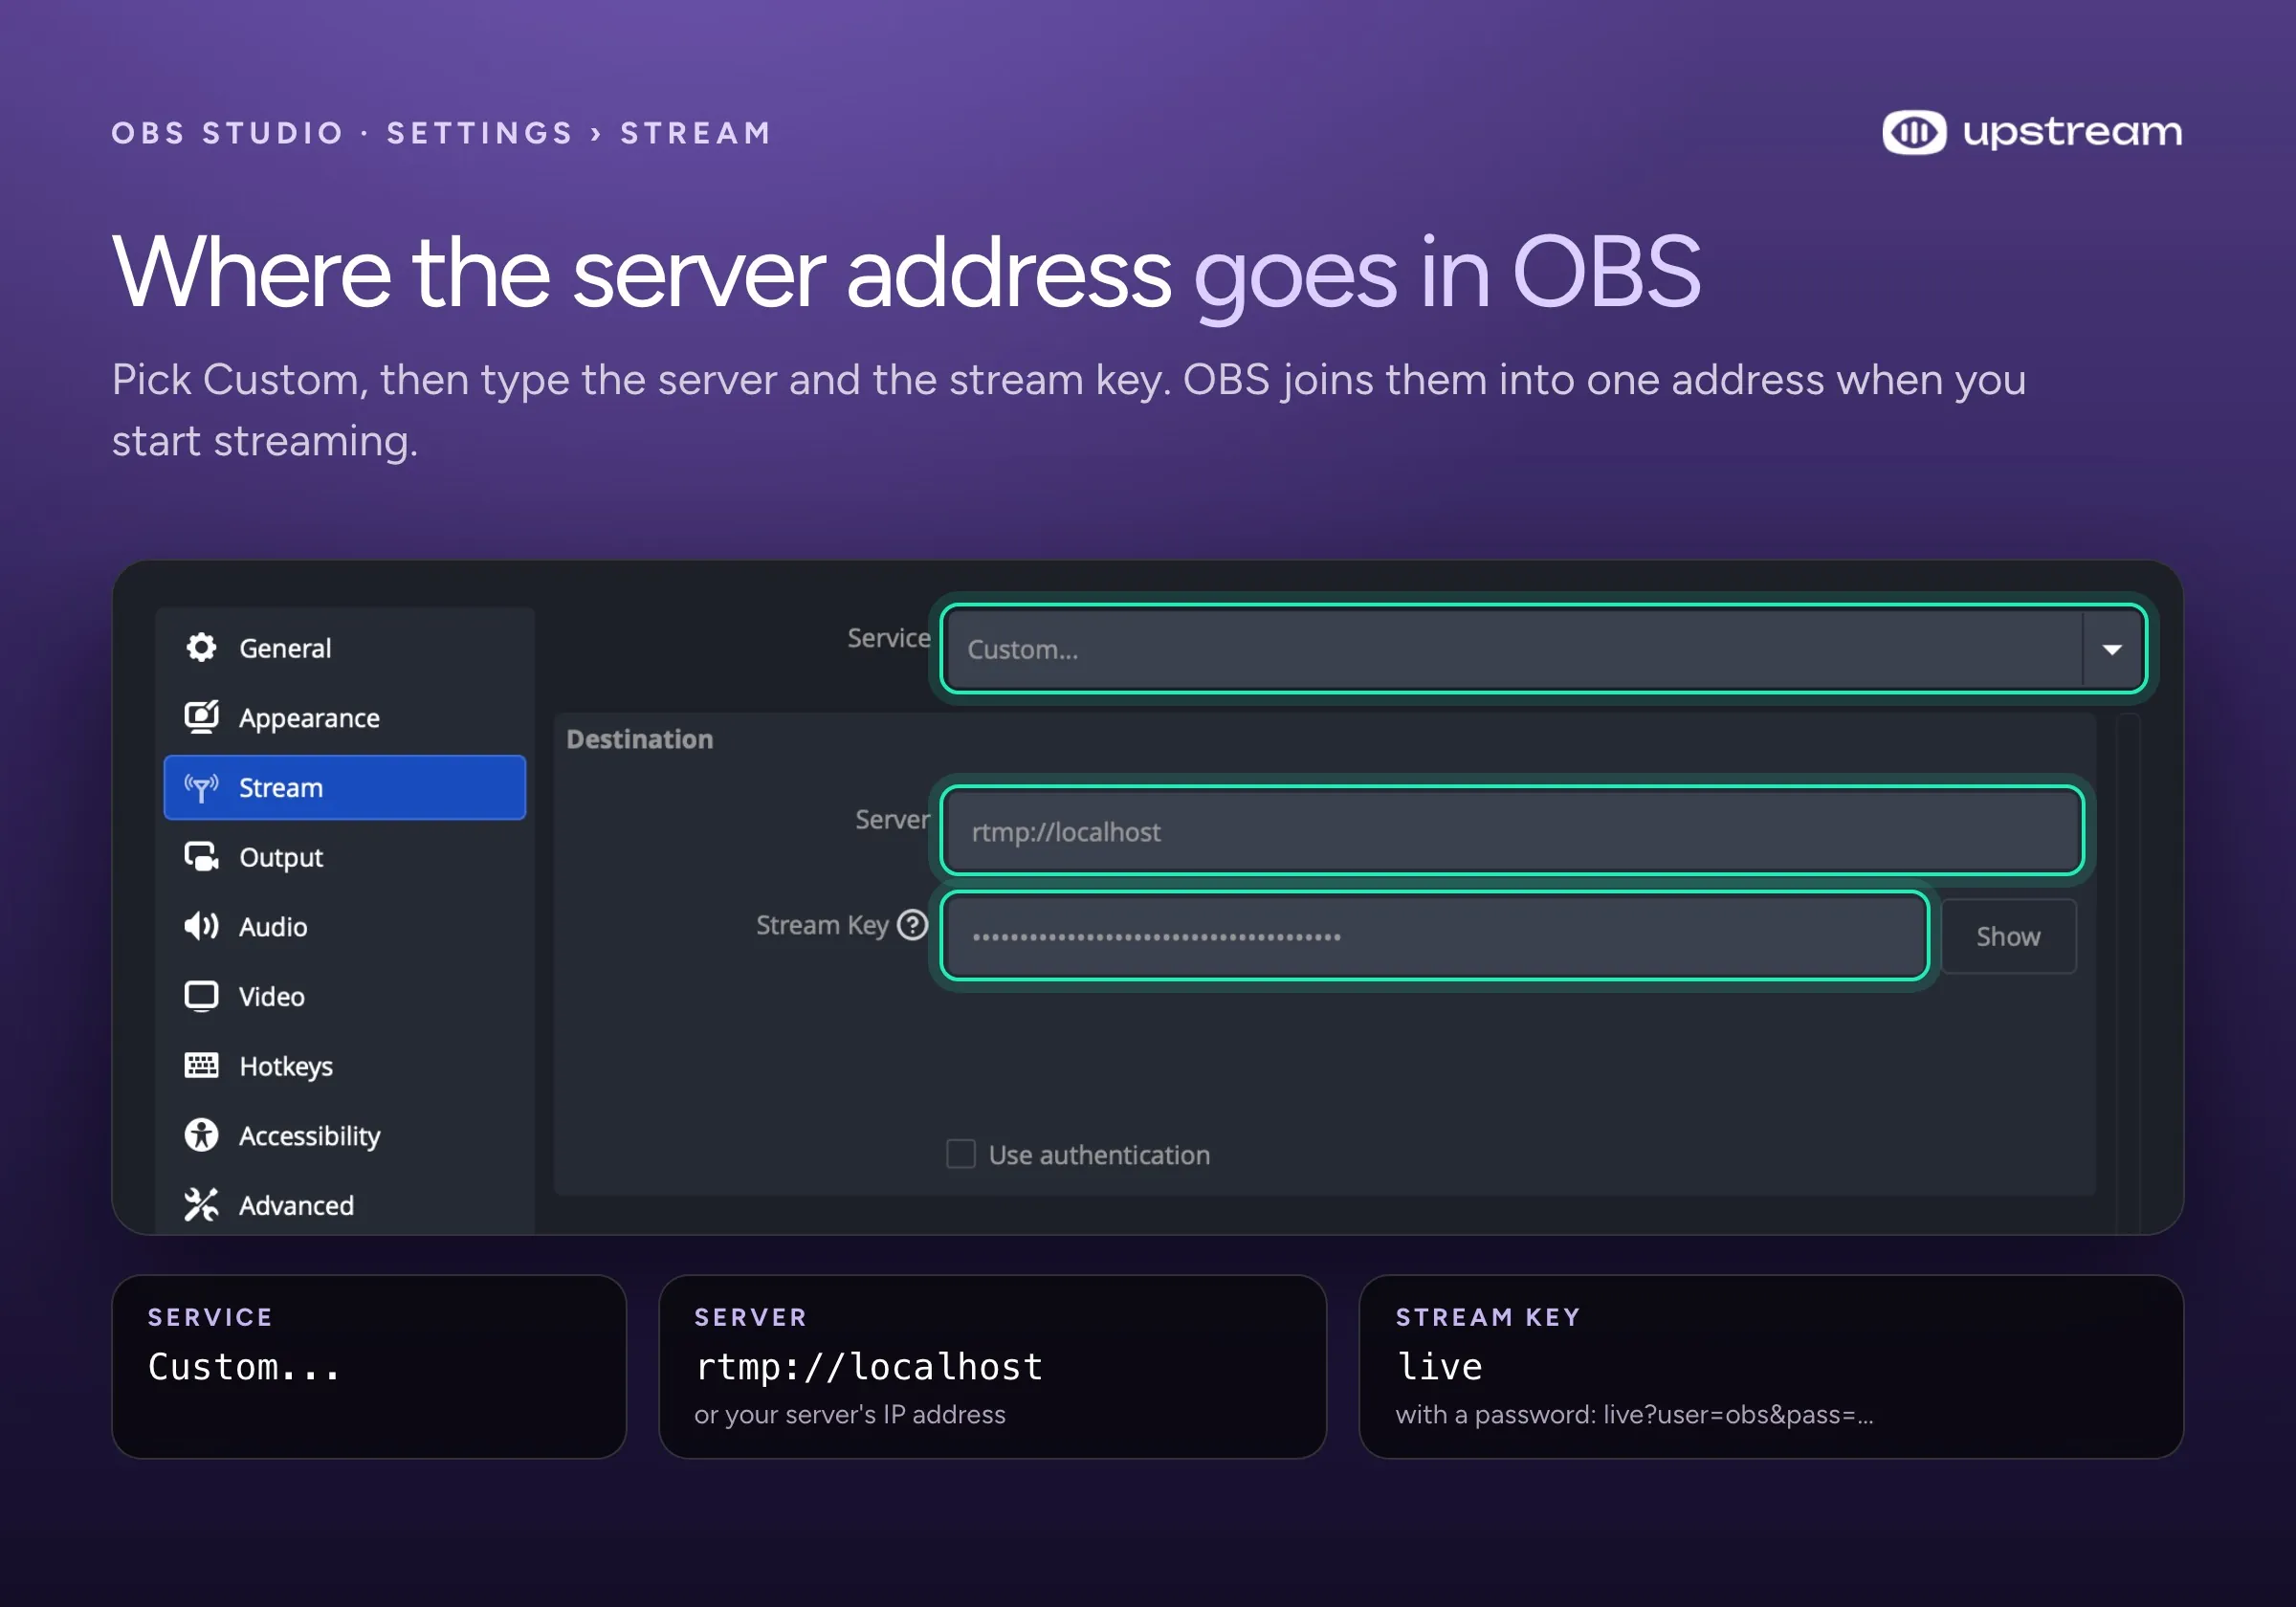
Click Start Streaming. MediaMTX logs is publishing to path 'live', which means the stream arrived. OBS puts the server and the key together into rtmp://localhost/live, and MediaMTX names the stream after the part after the address, here live.
Under Settings, then Output, switch Output Mode to Advanced and set Keyframe Interval to 2 seconds. YouTube recommends 2 seconds and Twitch asks for it, and it keeps HLS segments short, because HLS can only cut the stream at keyframes.
Watch the stream
MediaMTX plays a stream back in three ways:
- WebRTC in a browser: open
http://localhost:8889/live. This had the shortest delay in our test, but it plays the picture without sound (see below). - HLS in a browser: open
http://localhost:8888/live. This plays picture and sound and works in more players. - VLC: choose Media, then Open Network Stream, and enter
rtmp://localhost/live.
We measured the delay from the moment a frame was made to the moment it showed in the browser. Each frame carried a clock, and a second clock ran on the page, so one screenshot shows both. Over 10 samples each, WebRTC showed the frame after about 45 milliseconds, and HLS after about 4.5 seconds. Everything ran on one Mac, so a real network adds its own travel time to both.
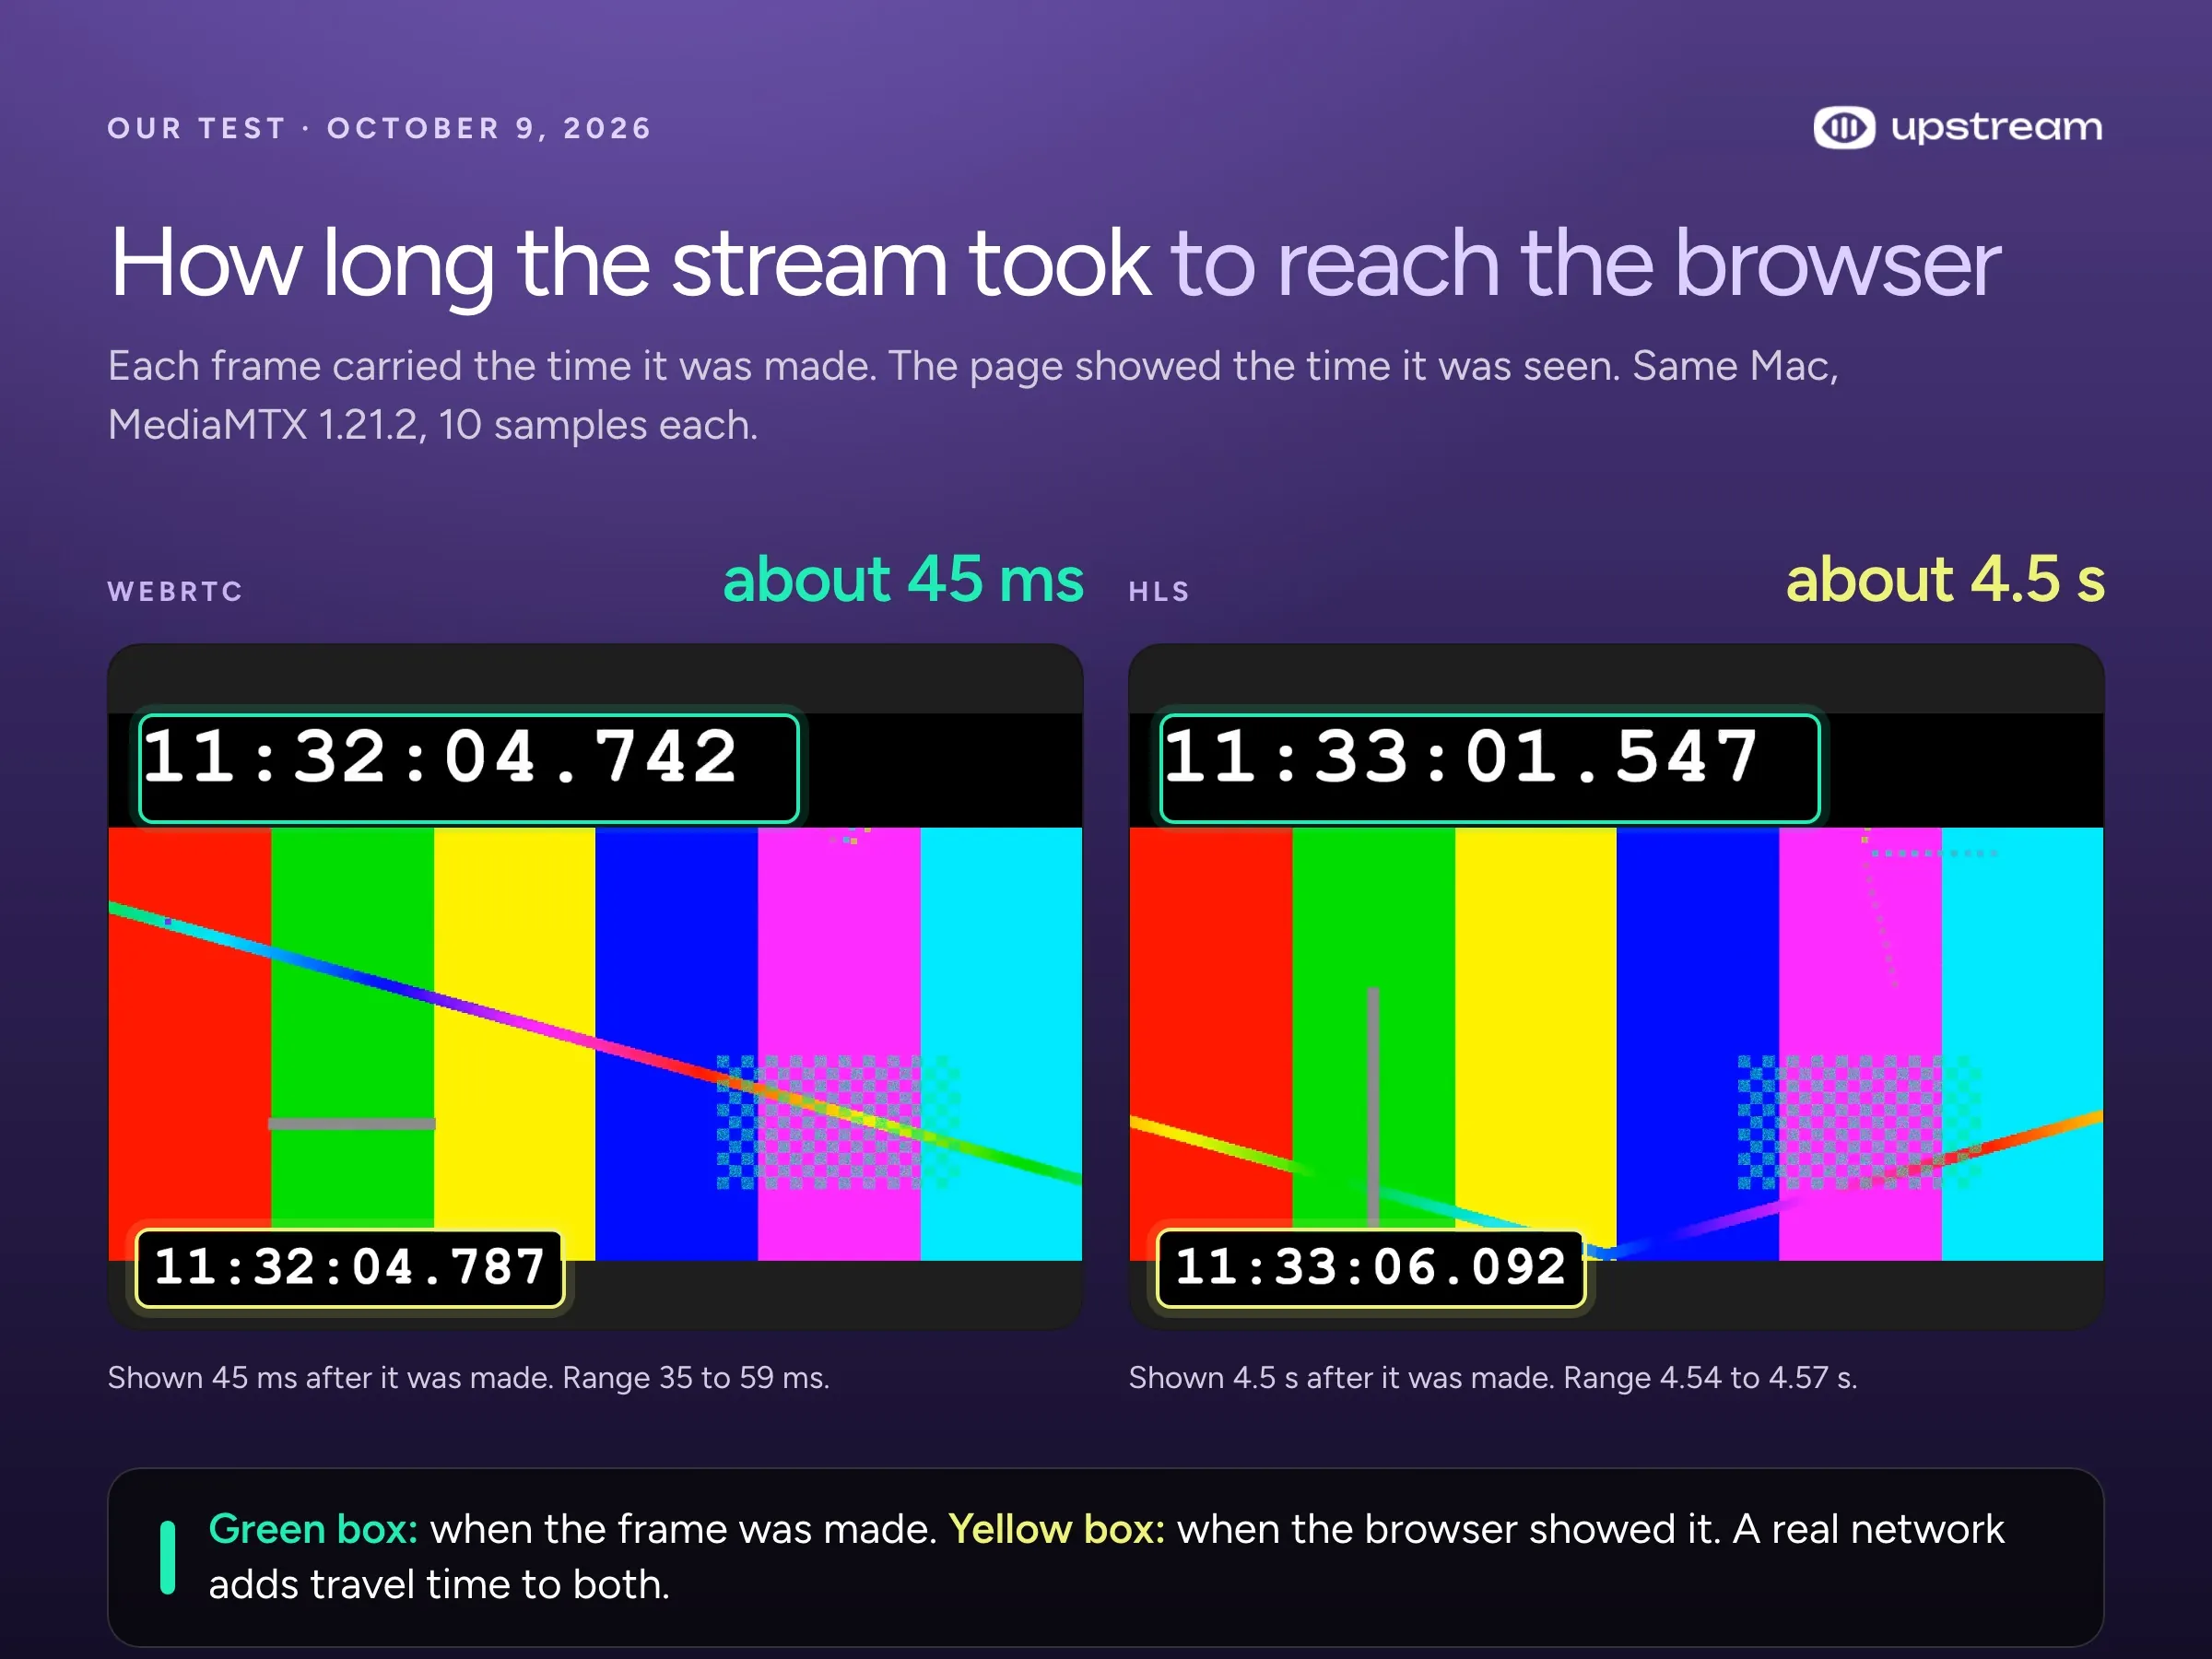
One catch with WebRTC: browsers don’t play AAC audio over WebRTC, and AAC is what OBS sends by default. MediaMTX logged skipping track 2 (MPEG-4 Audio) and played the picture alone. For WebRTC with sound, re-encode the audio to Opus, which MediaMTX’s re-encoding guide shows with ffmpeg. Otherwise use HLS, which plays both and only costs a few seconds of delay.
Lock it down before anyone else finds it
Out of the box, MediaMTX lets anyone who can reach port 1935 publish to any path. We sent a test stream to a made-up path with no password, and MediaMTX accepted it. Docker opens the port to your whole network, not just your computer, and on a server with a public IP address, to anyone who finds it.
Save this as mediamtx.yml:
# Only a client with the obs user and password may publish,
# and only to the path "live". Anyone may watch "live".
# The API, if you turn it on, only answers this machine.
authInternalUsers:
  - user: obs
    pass: change-this-password
    permissions:
      - action: publish
        path: live
  - user: any
    permissions:
      - action: read
        path: live
  - user: any
    ips: ['127.0.0.1', '::1']
    permissions:
      - action: api
      - action: metrics
paths:
  live:
Stop the first container with Ctrl+C. Then start MediaMTX again with the file mounted, from the folder where you saved it:
docker run --rm -it \
  -v "$(pwd)/mediamtx.yml:/mediamtx.yml:ro" \
  -p 1935:1935 -p 8888:8888 -p 8889:8889 -p 8189:8189/udp \
  -e MTX_WEBRTCADDITIONALHOSTS=127.0.0.1 \
  bluenviron/mediamtx:1
In OBS, keep the Server as rtmp://localhost and change the Stream Key to live?user=obs&pass=change-this-password. That layout, with the path and the password together in the key, is the one that worked in OBS 32.2.2. With the path in the Server field and only the password in the key, MediaMTX turned OBS away.
This is what we saw in the log:
| What we sent | What MediaMTX did |
|---|---|
| No password | failed to authenticate: authentication failed |
The password, but path other | path 'other' is not configured |
The password and path live | is publishing to path 'live' |
Change the password before you use this. Plain RTMP sends it unencrypted, so MediaMTX’s documentation recommends encryption or a VPN when the server is reachable from the internet. It can also store passwords as hashes instead of plain text.
Forward the stream to YouTube, Twitch or another server
MediaMTX can pass everything that arrives on a path on to other RTMP servers, without re-encoding it. Add a forward list under the path:
paths:
  live:
    forward:
      # Format: rtmps://server/app#streamKey
      - dest: rtmps://a.rtmps.youtube.com/live2#your-youtube-stream-key
      - dest: rtmps://ingest.global-contribute.live-video.net/app#your-twitch-stream-key
The part after # is the stream key, and the addresses are the ones MediaMTX’s documentation lists for YouTube and Twitch. Check them against your YouTube Studio and Twitch dashboard before you go live. MediaMTX can forward over RTMPS, which keeps the keys encrypted on the way.
We tested forwarding with two stand-in RTMP servers on the same Mac. When OBS connected, MediaMTX logged forwarding to for both within the same second, and in our ffmpeg test both servers received the full 1280×720 stream.
Every destination gets its own full copy. Our test stream was 2.6 Mbps, and each stand-in received about 3.2 Mbps with audio and overhead. If the server runs at home, three platforms at 6 Mbps each need about 18 Mbps of steady upload from your connection, plus audio and overhead, for as long as you’re live. On a rented server, that traffic counts against the provider’s bandwidth allowance instead.
The server itself barely noticed. With one stream in, two forwards and two browser viewers, MediaMTX used about 4% of one CPU core and under 85 MB of memory. The weak spot is the connection, not the software.
Why multistreaming from home is the weak spot
- Your upload is the limit. Three platforms at 6 Mbps need about 18 Mbps of steady upload plus headroom, and many home plans upload far less than they download.
- The copies compete for one connection. A dip your upload could ride out with one stream can push three copies over the limit, and every platform stutters at once.
- Every key lives in a config file. Adding a platform means editing the file by hand, and the keys sit there in plain text.
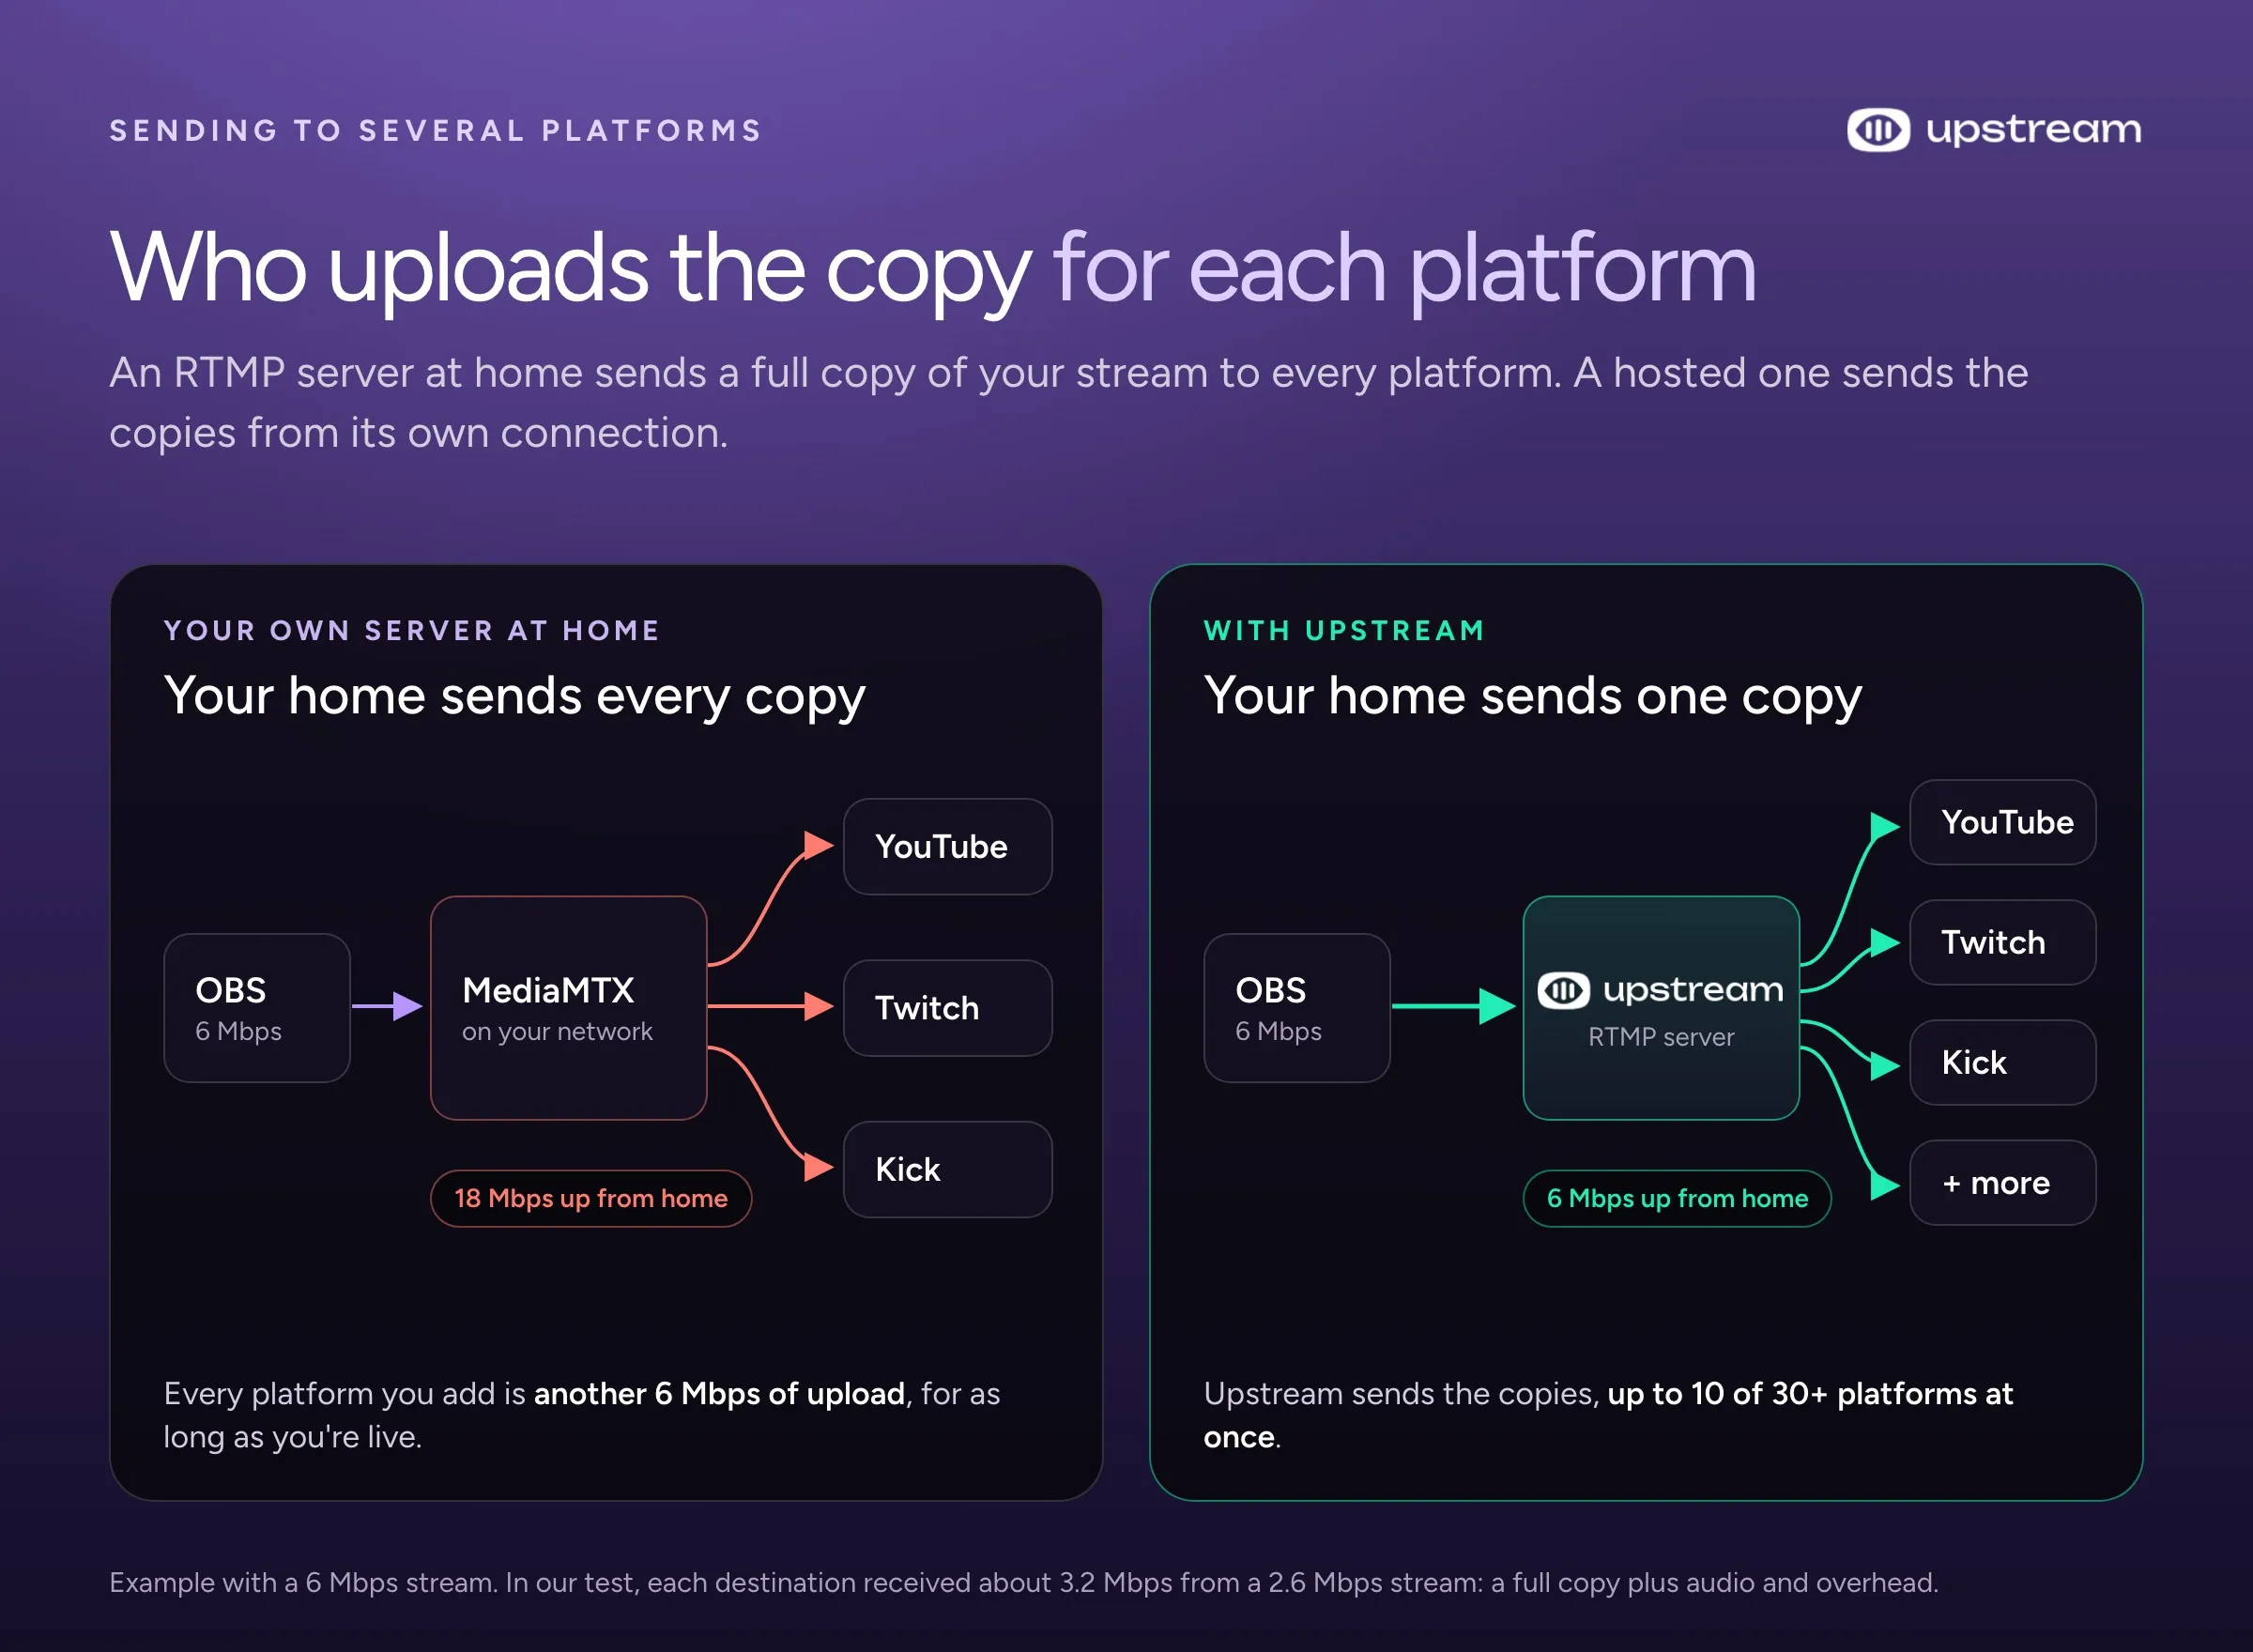
Or send one stream to Upstream and add your platforms there, so your upload stays at one copy. See the steps.
The nginx-rtmp alternative
nginx-rtmp shows up in many older guides, including a 2014 guide on the OBS forums. It still works. We ran this config in Docker, with our own network range and a test server in place of YouTube:
worker_processes auto;
rtmp_auto_push on;
events {}
rtmp {
    server {
        listen 1935;
        chunk_size 4096;
        application live {
            live on;
            record off;
            # Only these addresses may publish. Anyone may watch.
            allow publish 192.168.1.0/24;
            deny publish all;
            allow play all;
            # Send a copy to each platform, one line per destination.
            push rtmp://a.rtmp.youtube.com/live2/your-youtube-stream-key;
        }
    }
}
Publishing from an allowed address worked, and the push line delivered a copy to our stand-in server. Four things to know before you pick it:
- It isn’t part of standard nginx. You need nginx built with the module. The Docker image we used,
tiangolo/nginx-rtmp, is 803 MB, against 66 MB for MediaMTX. - Development has slowed. The module’s last code change was on December 24, 2024, and its last tagged release is v1.2.2.
- There’s no RTMPS. A request to add it has been open since 2016. To push to a platform that gives you an
rtmps://address, you need a tunnel such as stunnel in between. - Errors are quiet. The built-in rules work by IP address. Passwords need an
on_publishcallback to a separate login service you run. When we published from a blocked address, ffmpeg only said “Broken pipe”, so check nginx’s own logs when something fails.
If you already run nginx and only need RTMP in and RTMP out, it does the job. For anything new, MediaMTX takes less setup.
Running it on a server
To reach your RTMP server from outside your home, run it on a rented Linux server (VPS), or forward port 1935 on your router to the computer running it. Router forwarding only works if your internet provider gives you a public IP address. Then:
- Open TCP 1935 for RTMP. Open TCP 8888 for HLS viewers, and TCP 8889 plus UDP 8189 for WebRTC viewers, only if people will watch in a browser.
- Set
MTX_WEBRTCADDITIONALHOSTSto the server’s public IP address, so browsers can reach WebRTC. - Start the container with
-d --restart unless-stoppedinstead of--rm -it, so it runs in the background and starts again whenever Docker does. - Use the locked-down config above, with your own password.
Use Upstream and MediaMTX together
To run the website player on a server of your own, send OBS to Upstream once, then add your MediaMTX server in Upstream as a Custom RTMP destination, next to YouTube or Twitch. Upstream sends every platform its copy and your server its own, and your home connection still uploads one copy.
Before you set it up:
- MediaMTX has to run on a server Upstream can reach over the internet. Upstream can’t reach
localhostor your home network. - Your server takes one of your 10 destinations.
- Give MediaMTX a path and a publish password for Upstream, the same way as for OBS in the locked-down config above.
- Your server still serves every viewer of your site, so it pays for that bandwidth and its own security.
Want an RTMP server without running one? Get your RTMP server URL from Upstream. It’s free for 24 streaming hours a month.
Quick answers
Is there a free online RTMP server? Yes, hosted ones. Upstream’s free plan gives you an RTMP server URL and stream key with 24 streaming hours a month, and sends the stream on to up to 10 platforms. To receive a stream on a server of your own, run MediaMTX as shown above.
Can I run an RTMP server on Windows? Yes. Use Docker Desktop with the command above on one line, or download MediaMTX’s Windows file from its releases page and run mediamtx.exe. If other computers will connect, allow port 1935 in Windows Firewall.
What port does RTMP use? Usually TCP port 1935. RTMPS, the encrypted version, usually runs on 443. MediaMTX uses 1936 for RTMPS when you turn it on.
What’s the difference between an RTMP server and a stream key? The server URL is the address. The stream key names your stream on that server, and on platforms like YouTube it also works as your password, so keep it private.
Sources
- MediaMTX documentation, read Oct 9, 2026: install, publishing from OBS Studio, authentication, forwarding and playback in web browsers, plus the v1.21.2 release notes on GitHub.
- nginx-rtmp-module on GitHub: its directives and the open RTMPS request, issue 747.
- Release pages on GitHub: SRS v6.0-r2 and Owncast v0.3.0.
- Our test on Oct 9, 2026: MediaMTX 1.21.2 and nginx-rtmp in Docker on an Apple M3 Max Mac, with ffmpeg 7.1.1 and OBS Studio 32.2.2.