TL;DR
To run a 24/7 YouTube live stream with pre-recorded content, you need a verified YouTube channel (requires 24-hour activation), properly encoded video / audio files, and Streaming software like Upstream. You can connect via the YouTube API (one-click) or RTMP (manual). Using a cloud service allows your stream to stay live 24/7 without keeping your computer turned on.
What you need for 24/7 streaming
A Verified YouTube Channel (24-hour wait time)
Video Content (Ideally 2+ hours)
Streaming Software (e.g., Upstream.so) to sends the stream to YouTube
- Rights to all your content (don’t stream copyrighted content)
Before setting up your live stream collect your content and (re)encode it to the proper bitrate, framerate and resolution / size. If you are streaming in 1080p in 30 FPS, make sure to re-encode your 4k or 60FPS to smaller, more managable files. You can use a simple software like www.handbrake.fr to recode your video
Just please make sure to have the rights to all your content. Do not risk getting your content & channel taken down!
We recommend having at least 2-4 hours of content queued up
Set Up Your Channel for 24/7 Live Streaming
To set up an non-stop live stream, you’ll need to create a YouTube channel first, verify your phone number, and enable live streaming in the “Intermediate Features” tab.
✚ Create a Youtube Channel
The first step is to create a YouTube channel. If you already have one, skip to Step 2 (Verify Channel).
1. Go to YouTube.com and sign in to your Google account.
2. Click on Your Profile Icon, then on “Settings” and find the “+ Create a channel” button.
Find “Add or manage your channel(s)” if you don’t see the button. If you want to create multiple channels, YouTube may ask you to verify your account for Advanced Features. This is done via a short 6 second video, your ID or building up your channel’s history (uploads, comments, content)
3. Give your YouTube channel the name, URL handle, and upload a profile picture.
URL handle is the text that comes after “youtube.com/” and always starts with “@”. It is “@username”.
✅ Verify Your Channel to Enable Live Streaming
Before live streaming you’ll need to verify the channel with a phone number:
1. Go to your YouTube channel and go to Settings
2. Go to the “Channel” tab and choose “Feature eligibility”,
3. Under Intermediate features, click on the “Verify Phone Number” button and enter your number.
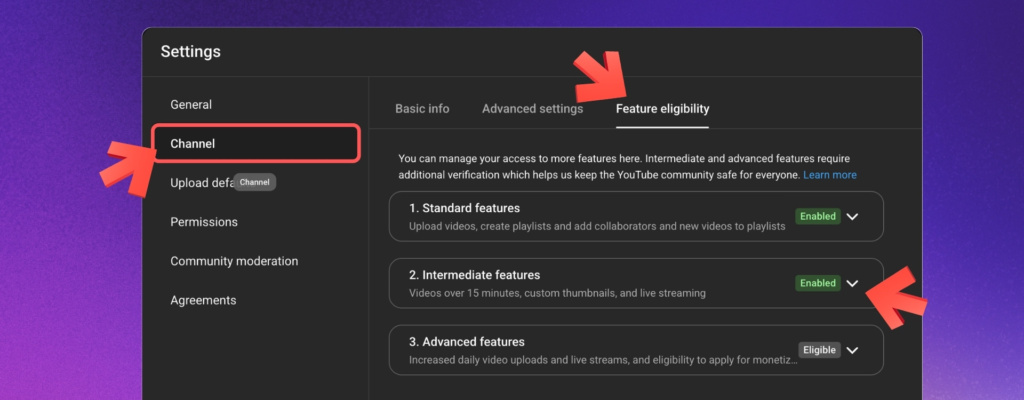
Once your phone number is verified and 24 hours pass, you’ll have Standard features and Intermediate features enabled (Live streaming falls under Intermediate features).
Two Ways to Stream to YouTube
There are two ways to stream to YouTube: Manual (with RTMP key) and YouTube Connect (API connection handled by Upstream).
⚖️ Compare Manual (w/RTMP Stream Key) vs YouTube Connect
| Feature | Manual (RTMP) | YouTube Connect (API) |
|---|---|---|
| Method | Manual copy/paste of RTMP keys | Direct API connection via Upstream |
| Workflow | Like OBS, Setup in YouTube Studio first | Start stream directly from Upstream |
| Ease of Use | Multi-step / “Old School” | One-click / Integrated (no stream key copy pasting) |
| Studio Access | Required every time | Not required after initial link |
METHOD 1:
Set Up YouTube Connect on Upstream
- Open Upstream: Log in and click “Create new stream”.
- Select Platform: Choose YouTube as your destination.
- Link Your Account: Click the “Connect with YouTube” button.
- Grant Permissions: Select your Google account and click “Allow”.
- Configure Details: Fill in your Title, Thumbnail and other settings directly in Upstream.
- Add Content to the Playlist. For a full guide see this page.
- Go Live: On your Stream Thumbnail click “Start Stream”.
And that’s it! Your stream is now live on YouTube! It will stay live until you stop it or schedule an end to it. Your content playlist will loop.
METHOD 2:
Always-on YouTube Live Stream via RTMP Stream Key
Manual method means scheduling a new stream in YouTube Studio, configuring the settings and copying your stream key from YouTube Live Studio to Upstream. Then all you need to do is to start the broadcast on Upstream.
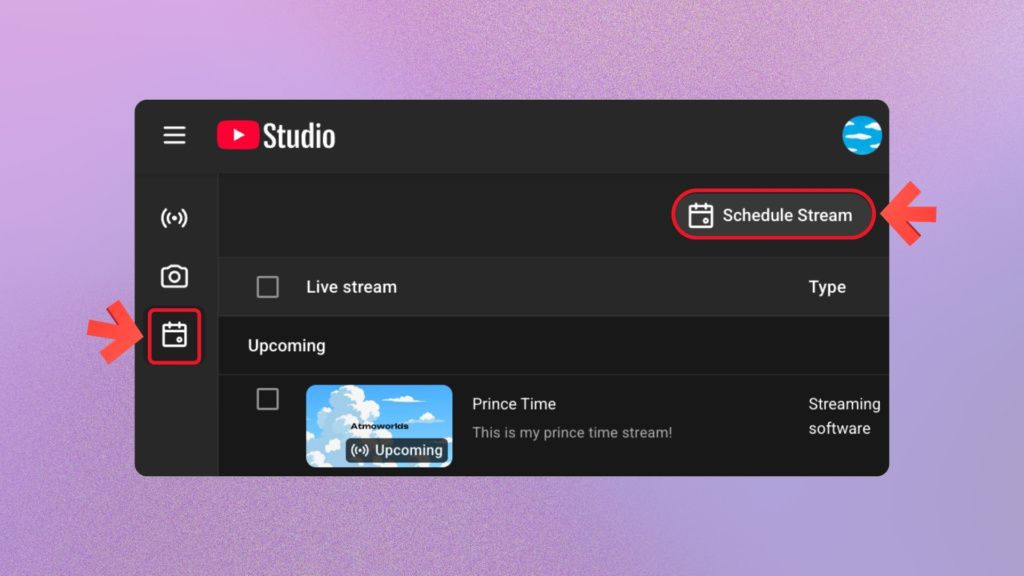
- Go to studio.youtube.com
- Click on “+ Create” and select “Go Live”
- If the wizard pops up, choose to go live “Later” and select “Streaming Software” as your Source
- Alternatively, click on Schedule Live Stream in the Manage Tab (Important!)
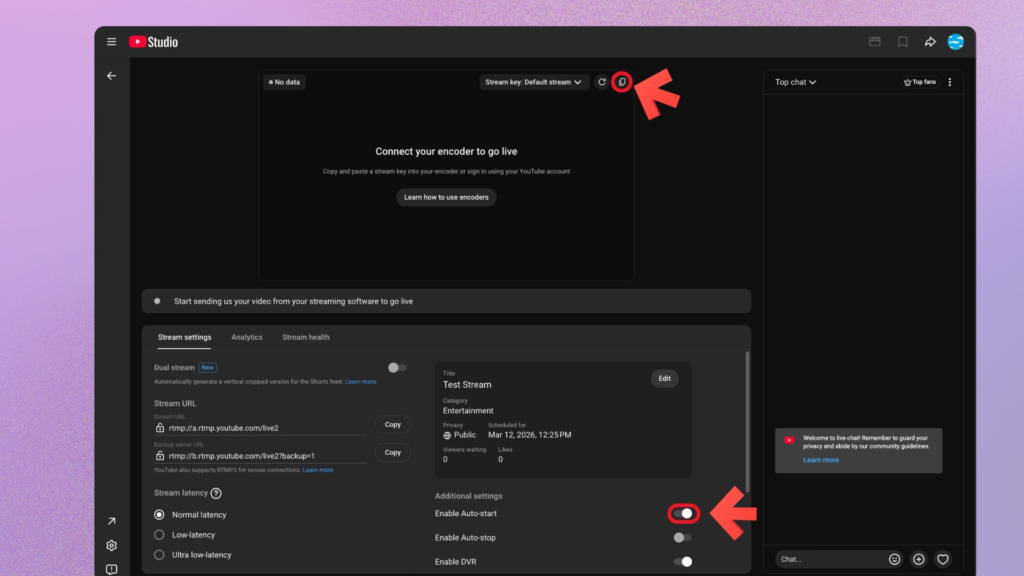
- Enter all the Details, Customisation and Visibility Settings (Title, Thumb, Description, made for kids…)
- Enable AUTO START
- Locate and Copy your Stream Key and keep it somewhere safe until you paste it into your Streaming Software.
Difference between “Schedule Live Stream” and “Go Live“
Choosing to “schedule” rather than simply “go live now” enables some extra functions: Auto Start, Auto Stop and Disconnect Protection / permanent live stream features. The simple Go Live function is meant for simple streams directly from devices, and we will not be using it for 24/7 live streaming. Here’s an overview of the extra features that appear when you choose “Schedule Live Stream” via the Manage tab:
Auto Start: The stream on YouTube will start IMMEDIATELY as the data comes in to YouTube (from the streaming software).
Auto Stop: The stream will automatically stop when no more data is being sent. Alternatively, YouTube will wait to reestablish the connection and resume the stream. We recommend having Auto Stop turned OFF if you are streaming 24/7. Auto Stop is useful for users who are scheduling stream end times via Upstream, as the stream can end at the scheduled time, without having to manually stop it in YouTube Studio.
Disconnect Protection / Permanent Stream: If a few seconds pass without any data getting into YouTube (encoder problems or internet failure) YouTube will attempt to resume the broadcast as soon as the data appears again. In the meantime, it will loop the last several seconds, as not to leave a blank screen. This setting is inbuilt in YouTube, and there is nothing you need to do to enable it (it is enabled by default when you choose to Schedule Your Stream
🔴 Set Up Your Streaming Software for 24/7 Live Streaming
The final step is creating a continuous broadcast is to configure your software to loop pre-recorded content and send it to YouTube’s servers. You can use any streaming software like OBS but we will be using Upstream for this tutorial:
Set up and Connect your Streaming Software to YouTube:
Sign Up: Create an account at upstream.so.
Click on “Create a new stream” in your dashboard.
Pre-recorded – 24/7 as your stream type
YouTube as your Destination and click on Manual Setup.
Configure your Stream Name, Resolution and Stream Key (copy-paste from YouTube Studio)
- Upload Content and add it to the Video (and/or Audio) Playlists
- Save & Publish your Changes
🏁 Start Your 24/7 Live Stream
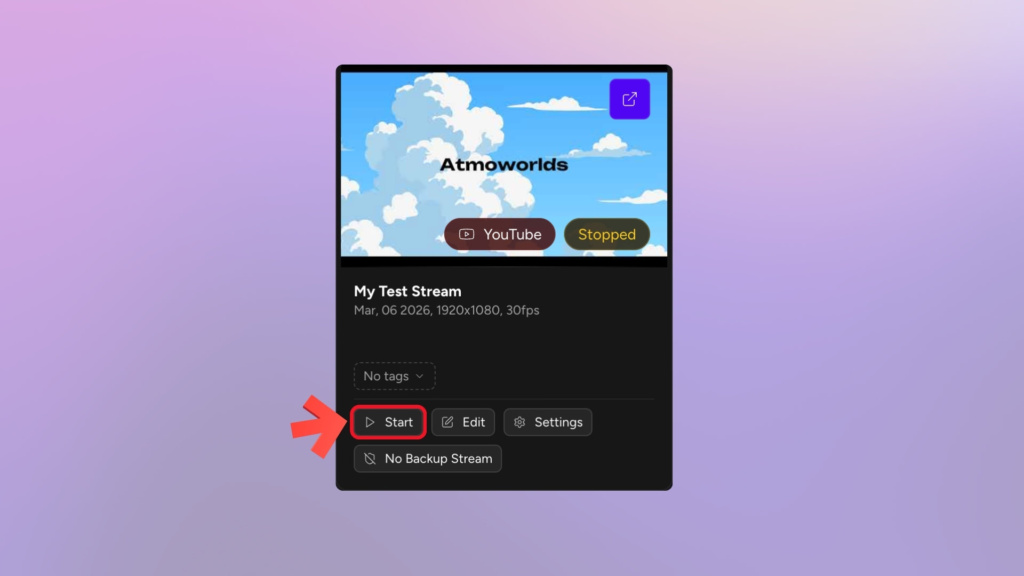
- Click the “Start Stream” button on Upstream (dashboard).
If you had enabled AUTO START in YouTube Studio, your broadcast will be automatically go live globally within a few seconds.
Verify Stream Connection
Confirm your stream is active by checking these three locations:
Upstream Dashboard: The status indicator should be Green and say “Streaming.”
YouTube Studio: Ensure the red “Live” icon is visible and that the connection is Good or Excellent!
Public Channel: Go to your channel’s Live tab on YouTube to confirm the stream is publicly visible.
Monitor & Engage
Regularly monitor your stream health. Use the live chat to respond to comments and engage your audience to build a loyal community.